|||
|
|
🗝 Login
🤖 Create Account
Main Menu
🚤 Model Boats
• Forum
• Build Blogs
• Media Gallery
• Boat Clubs & Lakes
• Events
• Boat Harbour
• How-To Articles
• Plans & Docs
• Useful Links
This Website
🔍 Search
📝 Guestbook
👨👩👧👦 Members (7,906)
📖 Quick Site Guide
📣 Support
👥 Membership
Hobby Supplies
🛍️ Online Shop
Not Registered
Go AD FREE & get your membership medal
BRONZE
Less Ads
SILVER
GOLD
Ad Free
Cancel
Anytime
Anytime
£2.50
£4.50
£6.50
Subscribe
Go AD FREE & get your membership medal
BRONZE
Less Ads
SILVER
GOLD
Ad Free
For A Whole Year!
£25
£45
£65
Donate
You Will Be Helping Towards:
Domain Fees
Security Certificates
iOS & Android App Fees
Website Hosting
Fast Servers
Data Backups
Upkeep & Maintenance
Administration Costs
Without your support the website wouldn't be what it is today.
Please consider donating towards these fees to help keep us afloat.
Read more
All donations are securely managed through PayPal.
Many thanks for your kind support
Without your support the website wouldn't be what it is today.
Please consider donating towards these fees to help keep us afloat.
Read more
All donations are securely managed through PayPal.
Many thanks for your kind support
Join Us On Social Media!

|

|

|
Download The App!
Login To
Remove Ads
Remove Ads
Login To
Remove Ads
Remove Ads
🏝️ About This Website
☝️ Terms of Service
🔏 Privacy Policy
Model Boats Website
Model Boats Website
Home
Forum
Build Blogs
Media Gallery
Boat Clubs & Lakes
Events
Boat Harbour
How-To Articles
Plans & Docs
Useful Links
Welcome to the Model Boats Website! A place for all model boaters!
Feel free to browse through the website, ask your questions, upload your photos or even start your own blog!
Feel free to browse through the website, ask your questions, upload your photos or even start your own blog!
Login To
Remove Ads
Remove Ads
Today's Question
What was the name of the ship that sank on its maiden voyage in 1912?
ANSWER >>
>
Today's Wordle
6 LETTERS
>
Trending Now
Blog
Re: £&@@£#!!
Hi Wolle, no just at the edges where a particular brand of masking tape was used. I guess some of the adhesive residue must have been left behind. Am considering flat-scraping the edges with a razor blade edge when it has fully cured and then satin coating the edges again. It happened in places on the port side and all the way down the stbd side.
🇬🇧 Trident73

19 minutes ago
Forum
Question of the Day?
Oh wow guys I never expected this, I am overwhelmed! Titanic is the answer! May the 18th. is now a special day for me!
I did get the answer right but my finger was shaking as I selected the option.
Looks like it will be a good day.
Roy
🇬🇧 roycv

32 minutes ago
Forum
TUG BOAT 686 Anyone have?
As I did with Annie P you could replace the stock r/c system with a 'proper' one, using small components / pieces.
My tug has been in my possession for 30 yrs and still works well.
I do not know its age when i acquired it!
🇫🇷 stotty1111
4 hours ago
Forum
Wordle of the Day?
Clued into combat on 4
🇺🇸 Cashrc

8 hours ago
Forum
Drifter Trawler Boat Formidable LT100
Hi Mike,
Plans are available from Model Boats Plans Service or whatever they are called now. The plans I have were drawn by John Pottinger.
There is also a book From Tree to Sea, written by Ted Frost which I have found invaluable.
If you have old Model Boats Magazines in the April and May 1993 editions there is the original article written by John Pottinger.
I hope this helps.
Cheers,
Stephen.
🇦🇺 stevedownunder

10 hours ago
Blog
Re: Construction report whaler Rau IX 1 : 45
Wolle!
🇺🇸 jumpugly

14 hours ago
Forum
Out of the box...
I have half done star fish here in MA and Kingfish at our LA location. Putting Rc in the king as it’s bigger. I’ll get around to it someday
🇺🇸 Hhager2

17 hours ago
Gallery
Re: TV Segment on the Suncoast Scale Model Boat Club (Florida, USA)
Here is the video link. Lew
https://www.youtube.com/watch?v=MOGidi6mdMo&ab_channel=eymccauley
🇺🇸 LewZ

18 hours ago
Blog
Planking Continues
I do not know how much I will get done this weekend, but in two weeks we are going down to four-day work weeks, and that will help. I was gifted a large quantity of balsa wood, and need to get this done so I can use that to revitalize a project that would not fit here as it is a Flying Boat. Still looking at August for 100 percent completion on this one.
🇺🇸 KevinH
19 hours ago
Harbour
Re: Vic Smeed Vivacity Cabin Cruiser construction
Finally getting back to work on the Vivacity Cabin Cruiser by Vic Smeed. Continuing with windows, and cabin top. And before planking the deck, installing the engine, it's a tight fit for the 1936 "Midget" engine.
*note to self: always do engine installation Before planking deck!
🇺🇸 Aerostar55

20 hours ago
Harbour
Re: (Working Vessel) Villa Class Tugboat
Lucky you. What a great tour.
🇩🇪 Wolle

20 hours ago
Blog
Re: New Battery
Very good Fred. You solved it very well.
Do you have any photos to show us?
🇮🇹 AlessandroSPQR
22 hours ago
Forum
Emma C Berry
Hi Isaac, I thought all the sails were controlled by a single closed loop winch.
I figured it was an old location.
It could be used for other purposes, sit there inert, or be removed, only Mike knows.
🇮🇹 AlessandroSPQR
23 hours ago
Harbour
Re: 6M - Renaissance Desigb
Hello neilw, now all that remains is to see it in the water.
🇮🇹 AlessandroSPQR
23 hours ago
Forum
Need help in identifying a brushless outboard motor
If that doesn't work out, I have another friend that sells 3D printed outboard kits.
His motors have the steering and tilt servos built in, so the motor is essentially self contained.
I've seen them run, and they work well.
He has done a really nice job of making them detailed.
Here is a link to the outboards on his webpage:
Dave B
While there take a peek at his pontoon kits.
Sorry if this post is against any rules, if so feel free to delete. I'm just trying to offer an alternative solution.
https://spykerworkshop.com/product-category/rcboats/outboardmotors/
🇺🇸 DWBrinkman
1 day ago
Blog
Re: NQD PX-16
Blessed duct tape. They even use it to repair real planes.
🇮🇹 AlessandroSPQR
2 days ago
|

New Member
Hong Kong
 HokitL
18 hours ago
New Member
Italy
vincenzob1 day ago
New Member
United Kingdom
DavidJamed1 day ago
New Promotion
Lieutenant Commander
BOATSHED1 day ago
New Promotion
Commodore
LewZ1 day ago
New Member
United States
JimB12 days ago
New Member
United Kingdom
PaulJS2 days ago
New Promotion
Leading Seaman
 AndyB2
2 days ago
Account Updated
Updated 'About Me'
geoff parkes2 days ago
New Member
United Kingdom
Biffa2 days ago
New Member
United States
JeffD3 days ago
New Promotion
Warrant Officer
stotty11114 days ago
New Member
United Kingdom
CJones4 days ago
New Member
United Kingdom
ColeenK4 days ago
New Member
JesusG4 days ago
New Member
United States
EdH25 days ago
New Member
Canada
RayR15 days ago
New Member
United Kingdom
JoA5 days ago
Birthday This Week
Turns 77
gunboat driver5 days ago
New Promotion
Chief Petty Officer 1st Class
 JockScott
6 days ago
New Promotion
Midshipman
Rudy-M6 days ago
New Member
United Kingdom
JohnH46 days ago
New Member
United Kingdom
GordonT6 days ago
New Member
United Kingdom
SimonF6 days ago
New Member
Czech Republic
MichalP7 days ago
New Promotion
Warrant Officer
KevinH7 days ago
New Member
United Kingdom
peterc47 days ago
New Promotion
Petty Officer 1st Class
 Hey-You
7 days ago
New Promotion
Master Seaman
Stuart Mackay8 days ago
New Member
United Kingdom
MartinF8 days ago
New Member
United Kingdom
JohnG28 days ago
New Promotion
Able Seaman
 MikeJ1
8 days ago
New Member
Australia
LanceS8 days ago
New Member
United Kingdom
MarkS19 days ago
New Member
United States
CharlesD9 days ago
New Member
United Kingdom
WilliamW19 days ago
Birthday This Week
Turns 71
Steves-s9 days ago
New Promotion
Master Seaman
Razor195510 days ago
New Member
United Kingdom
DonR10 days ago
Account Updated
Updated Signature
AndyB210 days ago
Account Updated
Updated 'About Me'
AndyB210 days ago
New Member
Canada
deepsea10 days ago
New Promotion
Commander
DWBrinkman10 days ago
New Member
United Kingdom
FrankJ11 days ago
New Member
United Kingdom
Robin Starfish11 days ago
New Member
United Kingdom
DouglasS11 days ago
New Member
United Kingdom
Farlam11 days ago
New Member
Australia
PeterJ211 days ago
See More
Forum Topics
Question of the Day?
Oh wow guys I never expected this, I am overwhelmed! Titanic is the answer! May the 18th. is now a special day for me!
I did get the answer right but my finger was shaking as I selected the option.
Looks like it will be a good day.
Roy
32 minutes ago by 🇬🇧 roycv ( Rear Admiral)
Rear Admiral)
Website Related
2507 Posts
6386 Likes
6386 Likes
Started
1 year ago
by fireboat
1 year ago
by fireboat
Latest
32 minutes ago
by roycv
32 minutes ago
by roycv
TUG BOAT 686 Anyone have?
As I did with Annie P you could replace the stock r/c system with a 'proper' one, using small components / pieces.
My tug has been in my possession for 30 yrs and still works well.
I do not know its age when i acquired it!
4 hours ago by 🇫🇷 stotty1111 ( Warrant Officer)
Warrant Officer)
Building Related
8 Posts
16 Likes
16 Likes
Started
2 days ago
by RonH
2 days ago
by RonH
Latest
4 hours ago
by stotty1111
4 hours ago
by stotty1111
Wordle of the Day?
Clued into combat on 4
8 hours ago by 🇺🇸 Cashrc ( Vice Admiral)
Vice Admiral)
Website Related
1336 Posts
2677 Likes
2677 Likes
Started
11 months ago
by fireboat
11 months ago
by fireboat
Latest
8 hours ago
by Cashrc
8 hours ago
by Cashrc
Drifter Trawler Boat Formidable LT100
Hi Mike,
Plans are available from Model Boats Plans Service or whatever they are called now. The plans I have were drawn by John Pottinger.
There is also a book From Tree to Sea, written by Ted Frost which I have found invaluable.
If you have old Model Boats Magazines in the April and May 1993 editions there is the original article written by John Pottinger.
I hope this helps.
Cheers,
Stephen.
10 hours ago by 🇦🇺 stevedownunder ( Captain)
Captain)
For Sale/Wanted
7 Posts
16 Likes
16 Likes
Started
16 hours ago
by mturpin013
16 hours ago
by mturpin013
Latest
10 hours ago
by stevedownunder
10 hours ago
by stevedownunder
Out of the box...
I have half done star fish here in MA and Kingfish at our LA location. Putting Rc in the king as it’s bigger. I’ll get around to it someday
17 hours ago by 🇺🇸 Hhager2 ( Midshipman)
Midshipman)
Building Related
2 Posts
8 Likes
8 Likes
Started
18 hours ago
by jumpugly
18 hours ago
by jumpugly
Latest
17 hours ago
by Hhager2
17 hours ago
by Hhager2
|
|
Login To
Remove Ads
Remove Ads
Build Blogs
15 Posts
15 Followers
151 Likes
Occre Ulises
Was given the Occre kit of the “Ulises” ocean going tug for Christmas. Started the build this weekend but I reckon it is going to be a bit of a drawn-out build for a while as I have a lot going on with work and other things. I will gradually add photos of my progress…
Re comment about kit suppliedpropshaft - I agree, I didn’t like the look of that one in the kit so I cut down an old one I had from something else, put the bearing back in with the addition of a touch of solder To make sure it stayed there and I added the oiler tube as well by soldering that on.
🇬🇧 Trident73
1 hour ago


8 Posts
3 Followers
47 Likes
52' Motor Lifeboat Victory
One of my nine-year projects is coming to an end. I am sad to see it completed in some ways, overjoyed in others. Many projects have been begun and shelved over those nine years; some are in the trash now.
What is known is the 213' WMEC-168 Yocona is hit or miss whether my attempts to waterproof a static hull will be successful. So on hold or a side project.
The Gunboat Philadelphia is on-going at work between shifts.
PBY that doesn't Fly I will place on hold, pending possible actual flight. (That will put three aircraft inline to be completed.)
The battleship North Carolina....Big. Not so complex as physically large undertaking.
SO, begin at the beginning as I tell my students. I pondered purchasing the laser-cut kit from Canada, but it is just frames, deck, and pilothouse. Yes, it is 1" to one foot scale, and would match my 44' MLB perfectly, but $286 plus shipping? For me too much, I will build at 1/24th scale for now. Small enough to store, big enough to detail and outfit with running gear.
My 44 MLB, is a leaky, but I am installing an automatic bilge pump. I get so much joy out of running it, and I will have the tri-fecta of MLB's 36', 44', and 52'. The 213 should be complete around the time I finish, so four CG projects in a years time, plus the Philly is a quick build. So, it is a year, year and a half plan.
This will be a slow one.
Non Boat picture is project that is almost complete.
Kevin
🇺🇸 KevinH
19 hours ago


14 Posts
5 Followers
74 Likes
NQD PX-16
Hi Shipmates,
After many years I finally found one at a good price £20 plus £10 p&p on good old Ebay.
I have a load of hardware sitting around, motors rudders etc. So I decided to play about with this boat.
Generally it is considered a waste of time and money to do anything with these boats.
So I don't expect any 'Likes' on this project, its a bit of a daft thing to do.
Information about 32in long twin stepped catamaran hull, beam 9.25 inches, thin ABS plastic.
First stage.
Unpack and check, strip out all of the hardware, generally unscrew components, most difficult thing was removing the propeller shafts.
Second stage wash hull with warm soapy water (in the Bath) and remove stickers.
🇬🇧 CB90
2 days ago


18 Posts
13 Followers
144 Likes
1/72 Clyde Puffer
Hi One & All
Back in 1997 I purchased two vacform hull for a 1/72 Clyde Puffer along with the drawings from Sarik (drawing MM1410), as we have been having some bad weather of late and due to their size they started to look like a good boat to start building in the house. (just to keep warm), over the last few weeks I have joined the two half’s of the hull, fitted the motor and shaft, alone with the deck, I have made a mistake when it comes to fixing the rudder, I should have made some form of fixing that went into the hull, so that the rudder had some were to fasten to, (will sort that out later on in the build) also I need to make some form of support for the shaft as I think it will in time work its way lose, moving on, the stern deck has been started and over half has now been planked.
Fred
🇬🇧 Fred

2 days ago


1 Post
1 Follower
9 Likes
Hansjolle
The Hansa dinghy was introduced in 1947 by Henry Rasmussen and a kit is available from German manufacturers Aeronaut, the hull is 940mm long.
Have made some reasonable progress so far and would be interested in hearing from anyone else who has built one of these kits, especially concerning the ballast.
The kit contains a plastic keel, which I have replaced with one made from 3mm stainless steel, to add some weight low down. The hull shape allows for lead shot and resin to be added, as on the real boat. The kit also does suggest an added "clamp on" weight to the end of the keel, which I'm planning to do. I'll drill a small hole in the lower area of the keel and use a two piece weight that can be clamped around the keel, with a pin going through the hole, to ensure the weight can not drop off. This is most likely to be made from brass.
Its the relative weight of the keel and lead shot that needs to be considered. Current thinking, is to add the weight to the keel, do a float test, with batteries and RC equipment etc on board, and then add lead shot to bring the boat down to its water line and correct trim.
I have found a couple of "build blogs" on German sites, but they seem to follow the instructions and just add lead shot in the bottom of the hull.
Any other suggestions or experiences? - thanks
🇬🇧 AndyB2
2 days ago


24 Posts
21 Followers
280 Likes
CGINGA IV
I am pushing the boat out really early in fact in its embryonic stage for this build blog and I might regret it but hope not.
It has been my dream of some weeks that my preferred build for the future would be a great looking motor sailor and the one I settled on was Inga 1v and with encouragement from roycv who has in his harbour a splendid example set the ball rolling.
There does not seem to be much interest out there for this model mainly due to there being is no kits available, nor plans, nor plastic hulls being produced simply lots of pictures and of course some beautiful completed models.
First step and many thanks to tiggy_cat for sending me a set of plans for this model which arrived today. They are produced by Revell and are for the topsides which is great but leaves me with one of the challenges of my life that of drawing, stealing, borrowing whatever a plan of the hull shape. I fear that if I attempt to accurately draw the frames for the hull it might end sailing sideways.
Anyway as somebody once said `I have started so I will finish` interested then watch this space. Regards ChrisG
🇬🇧 ChrisG
4 days ago


1 Post
4 Followers
14 Likes
Billing Calypso
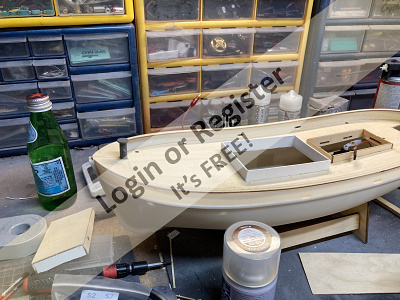
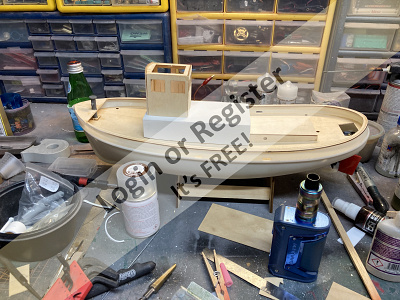
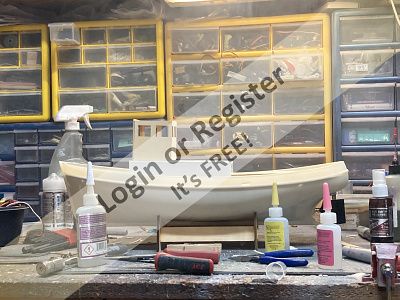
Picked this up at our first scale meet of the season early April, too much going on at the moment, but eventually managed to start this evening. The kit is over 20yrs old, was started and then put on "hold" by the previous owner. Hull is already assembled as was the observation chamber which was situated at the bow. As this "lends " itself to being lit internally, I have removed the brass observation windows plus the one on the bow and then attached some clear acetate on the back of them to make this forward area watertight. The observation chamber now glued in place, spraying to be carried out once this is dry and the "windows " can then be reinstated. Going to be a long job but looking forward to the build.
🇬🇧 Doogle
5 days ago


5 Posts
9 Followers
45 Likes
Gravy boat
A fun project to hopefully bring a smile .
Picked this up for the grand sum of £2.99.
A "bit " unsteady afloat, however some ballast will sort this out. Initial problem is trying to make a suitable hole for the prop shaft in the ceramic. Think I need to invest in some new drill bits as taking longer than I thought it would. More to follow
🇬🇧 Doogle
5 days ago


3 Posts
0 Followers
20 Likes
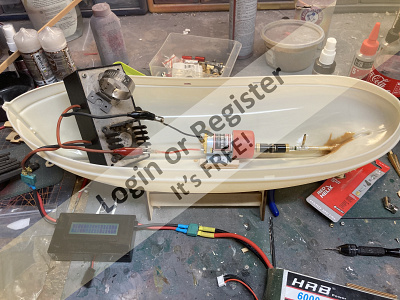
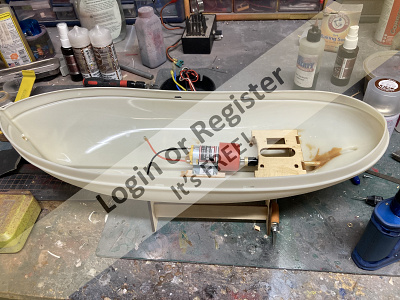
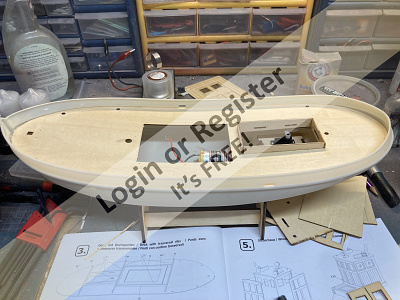
Al Khubar Harbour Tug
I have now started to build this Mountfleet (Model Slipway) Kit.
Firstly I decided to sort out the power system. 2 x RE540/1 geared motors (6:1). The propshafts supplied with the kit and the 4 blade brass props, also supplied.
🇬🇧 Rockbag
5 days ago


1 Post
1 Follower
6 Likes
Modifying a Posable (jointed) Figure to Loo Realistic
I just posted a video on how to modify a Bruder figure to look more realistic on YouTube. This also can apply to other figures that have flexible joints as well. The YouTube link is below.
Lew
Florida , USA️
https://youtu.be/TvrWWmZOI-U
🇺🇸 LewZ
5 days ago
1 Post
0 Followers
0 Likes
Typo
Never mind
🇺🇸 Cashrc
5 days ago

5 Posts
8 Followers
48 Likes
Graupner Krabbe Ton 12…the kit, not the boat😁
Hi y’all. After building the Caldercraft Clyde Puffer, and taking a break from building for a few weeks, I decided it was time to crank up my bench again. I had originally started on a kit that I got in a trade, a Deans Wacht Am Rhein…this boat had been started some time ago, probably a good decade before I got my hands on it, and it’s been in my kit stash for a good 5 years or so now. The original builder got the rudder and tube installed and the aft and mid deck in place, and some bulwark detail. I was working on a motor mount when I decided I just didn’t want to deal with masts and rigging at this time. At some point I’m going to finish that boat…just not now.
I’ve had a Graupner Krabbe Ton 12 in my kits stash for a bit. It’s the second version, when Graupner reorganized and sent the kit production to Asia, probably KYmodel. Same people who did the SAR rescue boat and the Taucher Wulf did this. It’s a nice little kit, well made, instructions are somewhat between the Tauchers “guidelines” and a Billings kit…better, but not quite there. Now, I know I said I didn’t want to fool around with a bunch of masts and booms and rigging, and the Krabbe has that in spades…so I decided to make something different. I thought about a slightly different take on a Kriegsfischkutter, or maybe a fishing boat to yacht conversion…but, I decided on a simple tug. Basically a 1930s or so diesel or converted steam tug, something smaller that you might see in the Great Lakes.
With that decision out of the way I went to work. First thing I did was to make up a 4mm shaft and tube. I used a Caldercraft Fineline tube that I had stolen the shaft from. I have a small collection of tubes and shafts, and a very few that are complete. Anyway, the kit uses a 3mm unit, and that’s just an odd size. Nothing wrong with it, just most of the props and fittings I’ve seen are for 1/8th, 3/16th, 2mm and 4mm. The 3 mm props and such are just harder to get…so I made up the tube by cutting down the Caldercraft unit to the length I wanted, and using the bushing from the discarded end I built up the tube, and added an oiler.
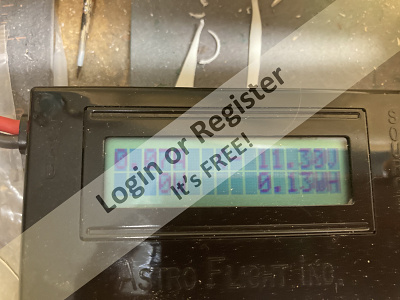
I then took on the task of choosing my power plant. The kit comes with a motor, a knock off of a Mabuchi RS380. My experience with these motors is that they make good model boat anchors. My first SAR that I built was completely stock, and I ran it on the recommended 6 cell nimh pack. After I had the boat completed and had about 6 good runs on it, she went dead in the water at Towne Lake. We retrieved it, and the motor had gotten hot, and the brush holders had softened from the heat and the brushes were not making contact….never again. I was thinking about my usual outrunner brushless, when I remembered I had a brand new MFA 2.5 to 1 380 sized geared motor in my possession. Went with that. After making up a mount and installing the shaft and tube I did a test run on the bench. At full chat, but no load it’spulling 0.07 amps on a 3 cell lipo.
Once that was squared away I used part of the motor mount/radio tray combo to mount the rudder servo, got the rudder mounted, and started to make up the deck houses.
One nice feature of this kit is that the deck slots into a groove in the hull. There are under deck stringers that are laser cut in the kit, once installed they give the deck a slight beam to beam curve. I used the kit parts to make up the aft coaming and house/hatch, and built up my fwd deckhouse and coming from plasticard. I then built up the wheelhouse using kit components..however, I built the deck and house “inside out”, i.e I’m not using the printed “decking” side as I’m probably going to paint the deck and house vs staining them.
That’s where I’m at now. I think the wheelhouse, as built looks a little too tall. I might leave it as this is supposed to be a small, River or Great Lakes tug, not an ocean going boat, and in some of the pics I looked up to get an idea of how I wanted her to look, some of the real boats had tallish pilot houses. I might cut it down about a half inch, but haven’t made the choice yet. Once I make that decision I’ll finish up the house and start figuring out details and what job this boats going to have…
Cash
🇺🇸 Cashrc
7 days ago


|
|

Media Gallery
TV Segment on the Suncoast Scale Model Boat Club (Florida, USA)
1 day ago by LewZ
More pics from the Edina Model Yacht Club Season Opener
10 days ago by DWBrinkman
INGA IV
29 days ago by philcaretaker
Lake Union Dreamboat
1 month ago by Brightwork
1958/9 50/55' Chris Craft Constellation
1 month ago by Brightwork
Filming "Dinghy Dan"
1 month ago by philcaretaker
"Dinghy Dan"
1 month ago by philcaretaker
"Dan, Dan the Dinghy Man"
2 months ago by philcaretaker
"Dinghy Dan"
2 months ago by philcaretaker
RNLI Severn Class
2 months ago by Rudy-M
Onboard a Focus 2 RC yacht
2 months ago by Rudy-M
Andy sails Topaz with df65's
2 months ago by MartinH2
|
|

Login To
Remove Ads
Remove Ads
Boat Clubs & Lakes
Recent Updates In Places

|
Helderberg Model Boat Club
5 days ago by 🇿🇦 Rudy-M (
Midshipman) |
|
|
Stade, Germany
10 days ago by 🇩🇪 Wolle (
Lieutenant Commander) |
|
|
Model Boating Association of South Africa
1 month ago by 🇿🇦 Rudy-M (
Midshipman) |
|
|
BUXTON MODEL BOAT CLUB
2 months ago by 🇬🇧 philcaretaker (
Commodore) |
|
|
Rawdon Model Boat Club
2 months ago by 🇬🇧 MikeC3 (
 Petty Officer 2nd Class) Petty Officer 2nd Class) |
|
|

Upcoming Events

|
Jun
8 2024
|
1 Day Only!
|
RAWDON MBC OPEN DAY
Starts 21 days time
|
|
|
Jun
9 2024
|
1 Day Only!
|
Edina Model Yacht Club - Parade of Boats at Centennial Lakes Ponds
Starts 22 days time
|
|
|
Aug
11 2024
|
1 Day Only!
|
Edina Model Yacht Club - Lighthouse Night #1
Starts 3 months time
|
|
|
Sep
7 2024
|
1 Day Only!
|
Edina Model Yacht Club - Lighthouse Night #2
Starts 4 months time
|
|
|
Oct
19 2024
|
Oct
20 2024
|
Blackpool Model Show
Starts 5 months time
|
|
|
Boat Harbour
1 Photo
14 Likes
6M - Renaissance Desigb
Have wanted a 6M for a long time, when this one popped up locally for an affordable price I had to drive into Cornwall last week.
Is a Renaissance design from 1990. Didn’t have too much to do, the RMG sail winch needed reprogramming so had to make a signal cable switch set travel and endpoints. Ended up rewiring the board removing old fittings. Made new deck patches to match the sail patches. After a good clean and tidy up is now looking nice.
🇬🇧 neilw
2 days ago
0 Attributes
3 Comments
1 Photo
19 Likes
Artesania Latina 20201 Amsterdam
I picked this up from the estate of a young man. As with most of my boats, it is sort of a "rescue". It is basically sound, but somebody before me cut all the wiring out of it.
It is equipped with all the lights the kit is supposed to have, as well as a bow thruster. I have started resoldering all the electrical connections, still working through what kind of wiring harnesses I will need to build for the various light circuits.
Some of the railings, etc. need rebuilding or re-attaching.
It should be a nice boat when finished.
Dave B
🇺🇸 DWBrinkman
11 days ago
6 Attributes
6 Comments
9 Photos
10 Likes
Springer #4 USACOE Stoplog
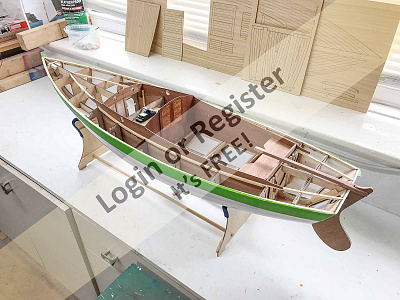
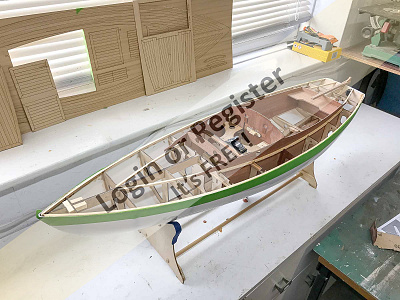
This is my fourth Springer tug. It was built to resemble the U.S. Army's Corps of Engineers stoplog tug located at Little Goose Dam in Washington State. The scale is about 1/17. The model had to be modified slightly because the length to beam ratio between the real tug and a Springer ae slightly different. This keeps the model within the Springer class rules.
🇺🇸 LewZ
18 days ago
10 Attributes
1 Comment
11 Photos
10 Likes
City of Sheffield
Tyne type lifeboat, moulded hull and deck very strong and light. Front and rear cabins remove over moulded deck combings leaving massive access to spacious hull.
🇬🇧 Rogal118
22 days ago
9 Attributes
5 Comments
4 Photos
19 Likes
Lulonga River Tug
Lulonga steam river tug. Broad beam twin stern paddles. Very stable and graceful on the water. Single motor (12 volt)chain driven from geared motor. Fitted with smoke mister, lights and sound. Unusual model built from plan. Lovely to sail on a summer evening.
🇬🇧 wmbc40
26 days ago
0 Attributes
19 Comments
7 Photos
10 Likes
Oppie
Way back when, there used to be a company producing grp hulls, they were based in Holyhead(?) or nearby, the business was sold, and I discovered they had some pieces for the Oppie, I bought them, constructed the model, sailed it, was impressed, so much so I embarked on the construction of the other exact 1:4 scale models.
🇫🇷 stotty1111
30 days ago
0 Attributes
3 Comments
3 Photos
17 Likes
Graupner Commodore
I acquired this Commodore and made some modifications so she is now a Chris Craft Roamer 37'
🇨🇦 Brightwork
1 month ago
4 Attributes
12 Comments
2 Photos
18 Likes
Billings Smit Nederalnd
I aquired this for free and did some restoration on her. I will probably give her to my brother.
🇨🇦 Brightwork
1 month ago
4 Attributes
9 Comments
5 Photos
13 Likes
1949 40' Chris Craft Challenger
This is based on the Dumas model plans. Model was produced by dumas as a kit in the 50's. I semi scratch built her from the plans.
🇨🇦 Brightwork
1 month ago
8 Attributes
6 Comments
|
|
How-To Articles
Need help trying to find some lights for my USCG MLB 47 foot 1:16 scale
Revised 14 days ago
By bruce1946
Question on Painting order
Revised 22 days ago
By bruce1946
LED – SERIES AND PARALLEL CIRCUITS – FLASHING CIRCUITS - Compendium of information
Revised 1 month ago
By AlessandroSPQR
Transmitter Camera Mount
Revised 2 months ago
By cjanik001
NAVAL PROPELLERS. Compendium of information.
Revised 2 months ago
By AlessandroSPQR
Lipo Battery Reference charts
Revised 3 months ago
By CB90
K.M.Y.C.A. Monthly magazine
Revised 3 months ago
By hermank
CALCULATION OF THE IMMERSED VOLUME (SIMPLE MATHEMATICAL/GEOMETRIC METHOD) OF YOUR MODEL
Revised 5 months ago
By AlessandroSPQR
Basic Model Boat Operations
Revised 5 months ago
By LewZ
Fiberglass boat hull
Revised 6 months ago
By northark
|
|

Login To
Remove Ads
Remove Ads
🛍️ Basket
Main menu transported here on mobile
Login
Create New Account
Trending Topics
Members Online
Blog
Re: £&@@£#!!
Trident73
19 minutes ago
Forum
Question of the Day?
roycv
32 minutes ago
Forum
TUG BOAT 686 Anyone have?
stotty1111
4 hours ago
Forum
Wordle of the Day?
Cashrc
8 hours ago
Forum
Drifter Trawler Boat Formidable LT100
stevedownunder
10 hours ago
Blog
Re: Construction report whaler Rau IX 1 : 45
jumpugly
14 hours ago
Forum
Out of the box...
Hhager2
17 hours ago
Gallery
Re: TV Segment on the Suncoast Scale Model Boat Club (Florida, USA)
LewZ
18 hours ago
Blog
Planking Continues
KevinH
19 hours ago
Harbour
Re: Vic Smeed Vivacity Cabin Cruiser construction
Aerostar55
20 hours ago
Harbour
Re: (Working Vessel) Villa Class Tugboat
Wolle
20 hours ago
Blog
Re: New Battery
AlessandroSPQR
22 hours ago
Forum
Emma C Berry
AlessandroSPQR
23 hours ago
Harbour
Re: 6M - Renaissance Desigb
AlessandroSPQR
23 hours ago
Forum
Need help in identifying a brushless outboard motor
DWBrinkman
1 day ago
Blog
Re: NQD PX-16
AlessandroSPQR
2 days ago
Blog
Re: Hansjolle
flaxbybuck
2 days ago
Blog
Re: Billing Calypso
AlessandroSPQR
2 days ago
Forum
Back to my workshop
AlessandroSPQR
2 days ago
Forum
Dutch sailing barge
AndyB2
3 days ago
Blog
Re: CGINGA1V
ChrisG
3 days ago
Forum
French Steering Championship by Nantes, Loire Atlantique
stotty1111
4 days ago
Forum
Return of the license, Finally!!
Doogle
4 days ago
Blog
A tight fit me thinks 🤔
Doogle
5 days ago
Blog
Superstructure
Rockbag
5 days ago
Forum
Flight Link Control Launch Link 2 channel radio control set
Stuart Mackay
5 days ago
Blog
Modifying a Posable (jointed) Figure to Loo Realistic
LewZ
5 days ago
Forum
CAP SAN DIEGO
Cashrc
5 days ago
luckyduck
Midshipman
1,007 Points
4 seconds ago
roycv
Rear Admiral
5,405 Points
1 minute ago
Trident73
Warrant Officer
734 Points
2 minutes ago
Hook
Recruit
0 Points
5 minutes ago
RossM
Sub-Lieutenant
1,480 Points
6 minutes ago

MouldBuilder
Vice Admiral
7,838 Points
16 minutes ago
Scratchbuilder
Vice Admiral
6,778 Points
19 minutes ago
PaulGrey
Recruit
0 Points
20 minutes ago
eddyc
Recruit
2 Points
20 minutes ago
AlessandroSPQR
Commodore
4,907 Points
22 minutes ago
Wolle
Lieutenant Commander
2,487 Points
26 minutes ago
Wd4ptc
Recruit
10 Points
27 minutes ago
Scamp
Petty Officer 1st Class
263 Points
33 minutes ago
neilw
Lieutenant
1,945 Points
47 minutes ago
Fred
Lieutenant
1,933 Points
49 minutes ago
DuncanP
Sub-Lieutenant
1,558 Points
56 minutes ago
Rockbag
Warrant Officer
685 Points
56 minutes ago
powell39
Recruit
0 Points
1 hour ago
Rowen
Captain
3,482 Points
1 hour ago
MarkS
Recruit
3 Points
2 hours ago
PhilH
Warrant Officer
674 Points
2 hours ago
TonyAsh
Chief Petty Officer 2nd Class
391 Points
2 hours ago

EdW
Midshipman
1,045 Points
2 hours ago
GregHiltz
Chief Petty Officer 2nd Class
383 Points
2 hours ago
MikeN12
Recruit
0 Points
2 hours ago
hermank
Captain
3,462 Points
2 hours ago
jonbliss152
Leading Seaman
72 Points
2 hours ago
LewZ
Commodore
4,021 Points
2 hours ago
edmet
Able Seaman
20 Points
2 hours ago
AndyN
Warrant Officer
676 Points
3 hours ago
Rogal118
Lieutenant Commander
2,482 Points
3 hours ago
tj6287
Recruit
0 Points
3 hours ago
stevedownunder
Captain
3,894 Points
3 hours ago
TonyH1
Recruit
0 Points
3 hours ago
bombero
Warrant Officer
823 Points
3 hours ago
DGoss999
Warrant Officer
682 Points
3 hours ago
SimpleSailor
Chief Petty Officer 1st Class
569 Points
3 hours ago
Steam-mad
Able Seaman
42 Points
4 hours ago
Ray
Able Seaman
39 Points
4 hours ago
stotty1111
Warrant Officer
622 Points
4 hours ago
paulc3
Able Seaman
20 Points
5 hours ago
DWBrinkman
Commander
2,581 Points
6 hours ago
Mingo
Recruit
0 Points
7 hours ago
Newby7
Fleet Admiral
10,661 Points
7 hours ago

AustinG
Chief Petty Officer 2nd Class
448 Points
7 hours ago
Chum444
Midshipman
967 Points
7 hours ago
RonH
Chief Petty Officer 1st Class
514 Points
7 hours ago
jumpugly
Commander
2,647 Points
7 hours ago
LeeA
Recruit
0 Points
7 hours ago
Nickthesteam
Commander
2,679 Points
7 hours ago
Login To
Remove Ads
Remove Ads
🏠
Home
Home
📰
Trending
Trending
💬
Forum
Forum
🗝
Login / Join
Login / Join
|
Cookies are used for ads personalisation.
By using this website you agree to our use of cookies. More Info |
Main Menu
🚤 Model Boats
• Forum
• Build Blogs
• Media Gallery
• Boat Clubs & Lakes
• Events
• Boat Harbour
• How-To Articles
• Useful Links
This Website
🔍 Search
📝 Guestbook
👨👩👧👦 Members (7,906)
📣 Support
Hobby Supplies
🛍️ Online Shop
Login
🗝 Login
🗝 Create New Account
▼
Media Gallery
X
1 of 4
► |
◄ |
Media Viewer
^
_
X
Share
X
Flag Inappropriate Post
X
| Select Reason | |
| Sexual content Includes graphic sexual activity, nudity, and other sexual content. | |
| Violent or repulsive content Violent or graphic content, or content posted to shock viewers. | |
| Hateful or abusive content Content that promotes hatred against protected groups, abuses vulnerable individuals, or engages in cyberbullying. | |
| Harmful dangerous acts Content that includes acts that may result in physical harm. | |
| Child abuse Content that includes sexual, predatory or abusive communications towards minors. | |
| Promotes terrorism Content intended to recruit for terrorist organisations, incite violence, glorify terrorist attacks, or otherwise promote acts of terrorism. | |
| Spam or misleading Content that is massively posted or otherwise misleading in nature. | |
| Infringes my rights Privacy, copyright and other legal complaints. | |
Basket Updated
X
Loading...
Loading
Loading Uploader...